In part one of this blog, we discovered the location of our seat bones and how to find them. Now, in part two, I’m going to talk about how to use them to influence the horse when you are riding.
The pelvis needs to be still in order for aids from the seat bones to be heard. By still, I don’t mean rigid, but as still as you can be in relation to the horses movements, so that you aren’t wiggling and shoving as you ride.
Stillness on a moving object (which a horse is, just like roller skates or skis), is generated by using our muscles isometrically. That is, opposing pairs of muscles work at the same intensity and tone to hold you still when you are travelling. The most important muscles on horseback for stabilisation are your core muscles, closely followed by your thigh muscles. To stabilise yourself with your core muscles, not only must you activate them, but you also need to create a forwards push with them that matches the oncoming forces. Mary Wanless calls this forwards push “bear down” but when you create it for yourself, there may be another name that fits better for you. Talented riders do this all the time.
To bear down, first find your abdominal muscles by clearing your throat, or coughing. It helps to put your fingertips firmly into your belly for some feedback. Once you have found these muscles, keep them switched on, and then pull them in towards your spine, and as you do so, imagine your abdominal muscles forming a wall around your guts. Next, push your guts out against the wall of muscle (this is the forwards push). It is the same thing you would do if you were on a bus or train and had nothing to hold onto! Hopefully you are now bearing down! It’s likely you will find it hard to breathe, but this will get easier with practice.
If you engage your abdominal muscles in the way I describe above, with your seat bones pointing down, and spine in neutral, you will become instantly more coherent to your horse. Also think of spreading your weight evenly down your thighs, and ‘kneeling’ on your knees, so that around 85% of your weight is shared by your underside and under thighs, and 15% or less is in the stirrup. It may take a while to get used to bearing down while you are riding, so practice doing it for a few minutes, and then have a rest, then practice again, as we learn best by contrast.
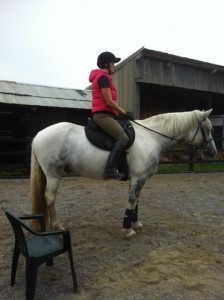
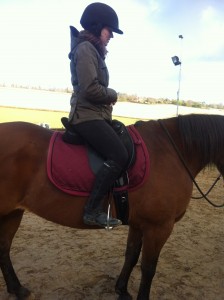
These are pictures of recently re-aligned riders. Note how their thigh is toned and ‘kneeling’ to support the weight of their upper body.
Now have a go at this exercise:
As you walk along on your horse, pay close attention to your seat bones in the saddle. Do they move side to side, or backwards and forwards? Ideally they should feel as if they are walking along the saddle in a forwards/backwards motion with each stride of the horse.
Next, make an approximate guess in your mind’s eye, of how much distance each seat bone moves with each stride. Then, half that distance. For example, if you think they move 2 inches with each stride, try to reduce that to one inch. Once that is established, half it again, to half an inch. You can keep going and eventually stop the movement altogether.
As you do this, it is likely that your horse will slow down, or if he is the whizzy type, you might be able to get his attention without having to pull. He will have responded to your stabilised pelvis, and then he will naturally slow down as your seat bones slow down. He may even stop. You may become aware now just how much kicking and shoving you have to do to keep your horse going, but try to resist this as you figure out what’s really happening with your seat bones.
At this point I find it helpful to appraise the ‘go’ aids, and re-define what’s working and what’s not, but that’s another blog! This exercise enables you to form an interface with your horses back, and ‘plug in’ to his long back muscles. It enables you to produce clear, coherent aids.
So how much movement do you actually need in your seat bones?
Enough to allow him to move forward freely, but not so much that you make unnecessary shoves or wiggles with each stride. Take time to experiment. Stopping the seat bones is actually part of a more refined ‘halt’ aid, which means you dont have to pull on the reins! What is important is that you are in control and aware of your movement, as opposed to being a passenger.


Well done Sally this is so well written. Hope to see you again at Overdale in the next couple of years when I make the great trek again from Australia
Hi Anne, thankyou. I do enjoy writing, so good to know its working!
Really enjoying the pictures that you add to explain things.
Well written! And just when I have a student who is struggling with this. Thanks!
Leslie
Thankyou Leslie
Very well written and clearly explained. Using this method to half halt has really helped.